
Modern Campaigns - Fulda Gap '85 by HPS Simulations
article\AAR by Glenn Saunders and Dave Blackburn
The Game and the System:
The Modern Campaigns game engine was developed by John Tiller, along with US Army veteran Major Greg "Sturmer" Smith and is published by HPS Simulations. It is based on a Map, an Order-of-Battle (OOB), and a Scenario Editor, which is used to create a series of situations called scenarios. Scenarios can be a small area and time frame, playable within a few hours, or larger campaigns covering huge areas, many units, and longer time frames.
There is a Programmed Opponent commonly referred to as the Artificial Intelligence or AI for short. This term is a misnomer, as an AI implies the ability to learn from repeat plays, and no PC game can do that yet. In any case, the game can be played solo against the "AI" and, if using the Fog-of-War (FOW) selection you won't see the opposing enemy units until you have a friendly unit able to spot their location. This ability to hide units you can't spot, using the FOW feature, is one of the principle advantages of the PC over traditional board games.

The game is based on a map with a hexagon grid system imposed over it for the purposes of movement and weapons range. Each hex in the Modern Campaigns Series is 1 mile and, like many board games you may be familiar with, this one allows non-HQ units to extend a Zone-of-Control (or ZOC) around the six adjacent hexes. Units in the game are companies and battalions. They maneuver in a turn based "I Go - U Go" system, with each turn cycle representing 3 hours day or 6 hours night.
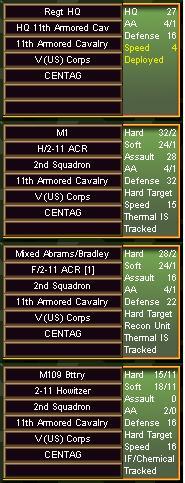
Units fight either by assaulting an enemy hex, or by engaging the enemy with Direct Fire (DF), usually into the adjacent hex. However, some units can engage targets by DF from more than one mile. Of course artillery can place supporting Indirect Fire (IDF) on location much further away. Also, Units can call in Air Support and the game goes on from there with its inherent details. (At the sides of the page are some sample game images. On the left us the front side or the default view of some units and in the game when you right click on the the unit are, more details and game factors can be seen.)
We like to think of our games as being "Elegantly simple". They are easy to play and extremely "user friendly" point and click interface. The basics can be learned quickly without a lot of reading of the manuals because the computer handles a lot of the details for the player. However, the game system although simple, has ways of handling many details in an elegant fashion without getting unduly complicated. Issues like tank breakdown, or air interdictions for example are factors that come into play in the battles we depict with this game and are controlled by simple parameters programmed into a text file. The parameters, and other features such as troop quality, battle fatigue, and low ammo or fuel is built into the game in such an elegant way as to make them factors in playing and master the game while keeping them in the background. Considerations such as Battle Fatigue continues to build up when troops are constantly exposed to action and if you don't give your men a break, before long you will find they become combat ineffective. All these factors are just part of the background making the game easy to learn and understand yet fun and fairly detailed for those who also want the game to be an accurate depiction of modern war. Therefore, once you get into playing the games there is no substitution for reading the documentation to further your understand of the detail. However, each title has a "Started Scenario" with a simple set of "read and play as you go" instructions to quickly get you into the basic functions of the game.
The map for Fulda Gap is based on a period source that has been scanned in pieces and assembled into a huge bitmap file to be loaded into the editor. For the game, the map is rotated 30 degrees so that north is actually UP-and-RIGHT. The Campaign Map area of Fulda Gap includes Central Germany, with the axis Frankfurt-Fulda-Leipzig as the main focus. The so-called "Fulda Gap "is the shortest way from the East German border to the Rhine. In this area, the American V, and West German III Corps had the primary responsibility to defend Frankfurt and the surrounding Rhine-Main area in the case of a Soviet attack. In early 2004, HPS released North German Plain '85 depicting the northern sector of this same attack, and later in the year, a combined Germany Map was released. This gave fans of the series a combined map from the Danish border all the way south to Karlsruhe in the south. In the future, we have plans to add a Southern Germany game as well, but as yet this project has not been scheduled.
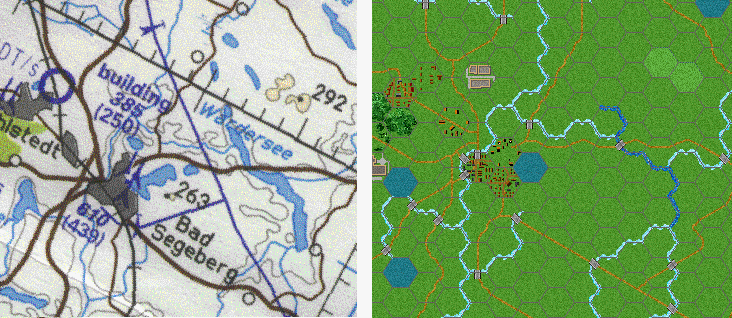
Below the image shows a sample of source map vs. game map in a small area on the North German Plain to illustrate how our map reflects the original and the degree of detail we use in making all our game maps.
Some people have wondered why we selected 1985 as the year of conflict. We chose this year because it marked the introduction of different weapon systems within NATO and the Warsaw Pact (WP). For example, beginning in the 80's the USA fielded the M1 Abrams, the Germans their Leopard II, and the Soviet Union the T-80 tank. Obviously, a certain time is required to deliver new equipment to all of the troops and to replace older models, which is the reason all units of NATO and the Warsaw Pact are not identical, notwithstanding countries with different tactical doctrines. A certain "pecking" order exists and generally the front line divisions receive the best equipment first. Also we had very good book sources about this time period, so why not use them? I stumbled across a book at the library and, as it looked promising at first look, I took it back home. After reading the introduction, I discovered it was written by an East German author and printed by the East German government. Everything was there, NATO structure, Division/Brigade structure, equipment from tanks to aircraft, ships to light weapons, very detailed battlefield tactics and so on. After some checking with Sturmer Smith, our resident military team member, we found that the information in the book was very accurate. Scary when you imagine this book was made for the public and the "secret" information available to the Warsaw Pact!
Thus, we determined 1985 a good representative year for the weapon systems of the late Cold War. The Leopard II had replaced older models in the Bundeswehr, plus the US Army in Germany had replaced the bulk of its M60A3s with the M1. On the Soviet side, the T-80 existed already in acceptable numbers, although only a very small part of the armored battalions were equipped with it. Also, with other weapon systems like M2 Bradley, the similar Martens I A2, and BMP-2, each side had reached the apex of its technological development.

The OOB for Fulda Gap'85 was surprisingly more of a challenge in the development of the game than one would expect from such a modern simulation. For the NATO dispositions, we used references from Isby and Kamps, Armies of NATO's Central Front, and Jane's, Publishing 1985, but post release we had information come forward suggesting that many US formations were being reorganized at that time, so we tuned this when we created North German Plain '85. For the Warsaw Pact, easily accessible information is not exactly abundant, however, Greg "Sturm "Smith had excellent information about the Armed Forces of the Warsaw Pact in the 80's.
Originally, it was intended that the NATO OOB would be left on the battalion level, exactly like the Warsaw Pact forces. However, we discussed the composition of the OOB for some time and finally decided it would be better to give more freedom of action to NATO to break the battalions down into companies. Also, this level mirrors NATO's doctrine of flexible defense.
Finally, with the map and OOB established, we began to build a story for events that we could depict in our alternative history. We considered how a "hot war "could be portrayed. The decisive idea came to us as we looked at the garrison map of East and West. What would happen if the Warsaw Pact executed a surprise attack? Would that have been at all possible without NATO having been aware of preparations? How much time would it have taken for the Warsaw Pact to move divisions to the West German border?
The last question could be answered using available data: it would have taken 6-9 hours to march the first wave of divisions from their garrison positions to the border, at least in theory. We assumed in this scenario that surprise would be more or less perfect. What would the Warsaw Pact have found in West Germany? They would find NATO units that were in their barracks, the road system completely intact and the population who have been completely surprised. This all would have brought the Warsaw Pact an immense advantage, and fast progress in the direction of the Rhine, without major resistance in the first few days. This lead to the building of our Campaign Scenario:
#10_01s: Plan Rhinegate
Central Germany, June 10th 1985: The plan by the Group of Soviet Forced Germany (GSFG), labeled the "the berserker strategy", was brutally simple. Surprise NATO by an unexpected assault and head westward towards the Rhine and crush NATO resistance along the way. The entire campaign depended on absolute surprise. All along the border of East and West Germany, Warsaw Pact divisions moved out of their garrison positions undetected and into staging positions for their attack on West Germany. The northern sector's main goal is Hannover, Hamburg and the Ruhr Valley, the industrial heart of Germany. The central sector, also called the "Fulda Gap", has the overall objective of capturing Frankfurt and Mainz and establishing a bridgehead across the Rhine. If Frankfurt could be captured then Bonn might even be seized as well. The southern sector's main objectives are to support the central sector's advance and cover its flank, at the same time capturing the strategic cities of Stuttgart, Nurnburg, Munich and crossing the Rhine to capture the city of Strasbourg in France. As the ground war starts the Red Banner Fleet will leaves its ports heading into the North Atlantic to prevent NATO supply convoys from reaching Europe. American, West German and Canadian forces are now scrambling to man their equipment and move to stop the onslaught while aircraft take to the air to battle for control of the skies over Europe. Both sides have been planning and preparing for this day. [Size: very large] Designer's notes: Best played as NATO, or Human vs. Human. Explicit Supply is possible. Full Standard Campaign.
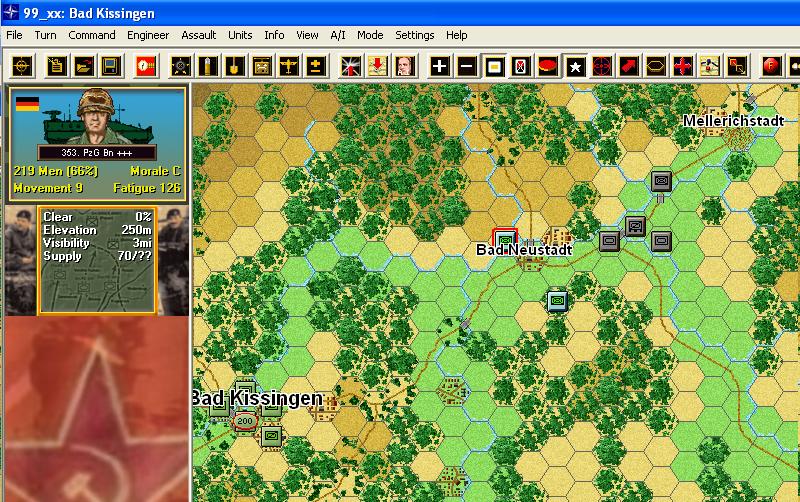
What it means for the Eaglehorse and the Bad Kissingen Area?
When Bob Stefanowicz recently approached HPS from the "Eaglehorse Website (www.eaglehorse.org) I looked at our Germany Campaign scenario, and shifted an East German Tank Division to advance down highway B287 to Bad Kissingen for the purpose of creatuing this scenario to illustrate our game system in a area many of the readers would be familar with. That is one of the advantages of designing situations for a "What If" war that never happened. As long as the story remains plausible, and smaller situations and events can be related to one another, players can "get into" that story.
With that in mind, and with the interest of the members of 2nd Squadron, 11th Armored Cavalry Regiment, my partner and I created this small scenario and would like to share with you part of the story:
99_09: The Eaglehorse at Bad Kissingen
Bad Kissingen, West Germany, June 10th 1985: As the Red Army swept across the frontier, surprising the NATO armies in their peace time deployment locations, it was the task of the 7th (GDR) Tank Div to cover the left flank of the 8th Guards Army, as they drove forward toward Fulda and Frankfurt. The task of the 7th Tank Division was simple, drive forward, sweeping aside the American 2/11 ACR garrison at Bad Kissingen, and cover the flank of the advancing 8th Guards Army and protect against NATO units driving north from Wurzburg. Designer Note: There is an exit hex in this scenario. [Size, small]]
Warsaw Pact At Start and Turn #1: 0900 10 June 1985
My orders were to move swiftly toward a hex on the west edge of the map from which Warsaw Pact units can exit and in doing so add points to the Warsaw Pact Player. For this mission I've been given the GDR 7th Tank Div made up of three Tank Regiments and 1 Motorized Rifle along with Divisional recon, Artilly and engineers. This division also has three Helicopter units comprising of recon, Anti-Tank and Air Mobile Infantry company. In support there with 4 chemical weapons strikes, 2 artillery mine missions, and for air support I have 4 airstrikes missions and 3 recon flights.
First thing, I decided to find out what was in Mellerichstadt using a recon flight. There was a unit in the town, so I decided to bypass it with the armor and use the infantry to deal with the town. I used the recon Heli flight to find a safe way round, but the heliborne troops and gunship escort did not move as requested into the town of Bad Neustadt to set up a block. Also my artillery got tangled up at the river crossing, as there was a bottleneck in the town caused by bad traffic discipline. I decided to hit the NATO unit in town with an airstrike.
Nato At Start and Turn #1: 0900 10 June 1985
At the start of this fight the Warsaw Pact are already on the move as they are player one and thus they move first. Clearly any action I take will be reactionary for at the beginning of play almost all of my units are FIXED and unable to maneuver. This simulates the surprise upon which the Warsaw Pact has caught Nato with and this situation exists along the entire line.
- The Nato force in this scenario comprises of the following:
- 2x battalions of the 35. Panzer Gren Regt - 660 Men at Mellerchstadt,
- 2nd\11th US Cav at Bad Kessingen with 69 mixed Brads and Abrams, and a squadron Abrams with 14 tanks as well as 8x M109's SP Arty pieces for support,
- The remainder of the 35. Panzer Gren Regt - 1x Btln of Panzer Gren, 39x Leopard I's and 12x Kanone's at Hammelburg near the west edge of the map,
- A couple US F16 Air Strikes that become available in the afternoon of the 10th.
There are a few other units but this is the Main force. However only the first group is available at start and these few units must hold the line against overwhelm odds to buy time for the others to release. The US Cav unit will be ready at 1500 Hrs and the remainder of the 35. Panzer Grens will become available at 1800 Hrs.
For now all I have at my disposal to delay the advance is those two battalions of the 35 Panzer Grenadier Regiment at Mellerchstadt. Fortunately the advancing East Germans could only make it up near the town but were unable to attack. However I did observe a number of enemy helicopters sweeping around my flanks so my own lines of communications are no longer secured.
My strategy for these to units is to continue to retire and hopefully withdrawing far enough to the next choke point so that the advancing enemy units can move up to my positions, but use enough of their movement so as to be unable to mount a serious attack by assaulting or even flanking my position.
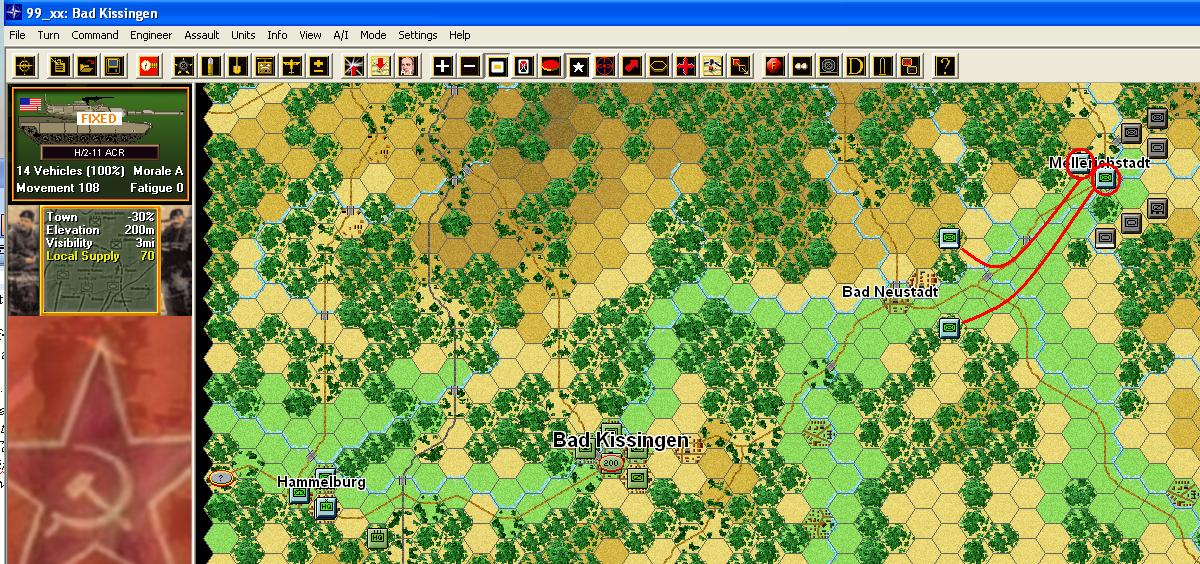
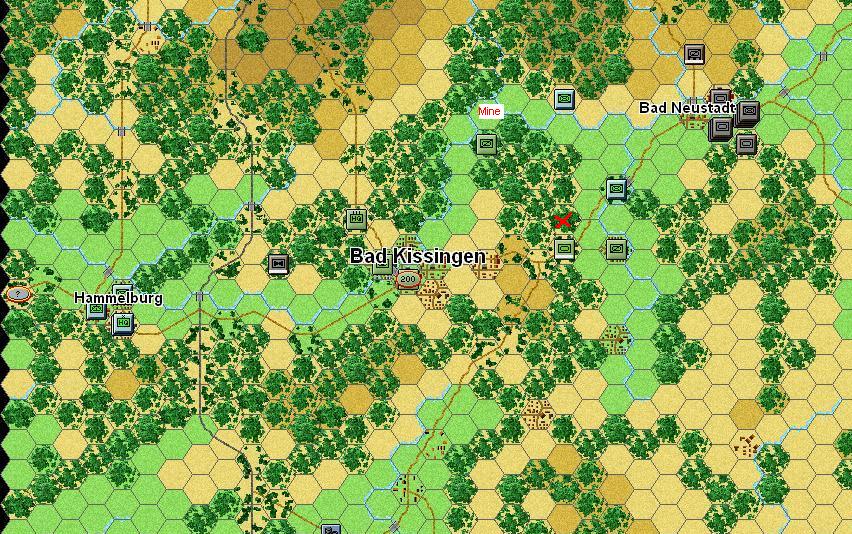
The image at the right shows my at start setup, the advancing elements of the GDR Tank Division and well as my new positions taken up holding the roads and choke points in front of Bad Neustadt. Please note you can click on any game map image in this article to load a full sized more detailed copy on a separate browser, allowing you to read and view the larger sized map. In this image there are only two West German Units - but the image shows locations before and after.
Warsaw Pact Turn #2: 1200 10 June 1985
Two NATO Mech Inf units were spotted pulling back from the town on Mellerichstadt. I tried to locate them with recon aircraft in the town of Bad Neustadt, but could not find them. I decided to use the Heli recon flight, it bumped into both units in good positions on the hills around the town. It was disrupted by accurate fire from these units. I ordered an airstrke on the northerly unit as it was not completely in position and was still in Travel mode. Good strike, killed 111 men. I then proceeded to move the column at best pace forward all along the line of march. The heliborne company and gunships also moved forward to a block position in the next village, but were late and are not set up yet.
Nato Turn #2: 1200 10 June 1985
A big hit this turn by a Warsaw Pact Air Strike on the north most unit. It caught the German Unit in Travel mode and inflicted over 100 men lost and heavy battle fatigue on the unit.
My plan for this turn is much like the last - having brought the advance to a halt, fall back again but this time not too far. Attempt to hold up the advance for another turn in the Bad Neustadt area. For now, all I can do is trade ground for time.
Warsaw Pact Turn #3: 1500 10 June 1985
The NATO mech units moved again, very elusive, but this time they did not move far, observed some fire - likely NATO defensive mines being setup by artillery??? Moved the heliborne units to a block to the west of Bad Kissingen for now. Started moving main forces up the valley road, did look at alternative routes but they would be too time consuming. Arty now moving forward quite well, small attack put in on southern NATO unit, small losses on both sides, but I want to keep him moving back, enough of these delays. No air strikes available this turn but I do have a single recon flight I can call on.
Nato Turn #3: 1500 10 June 1985
Another turn and another fall back position!
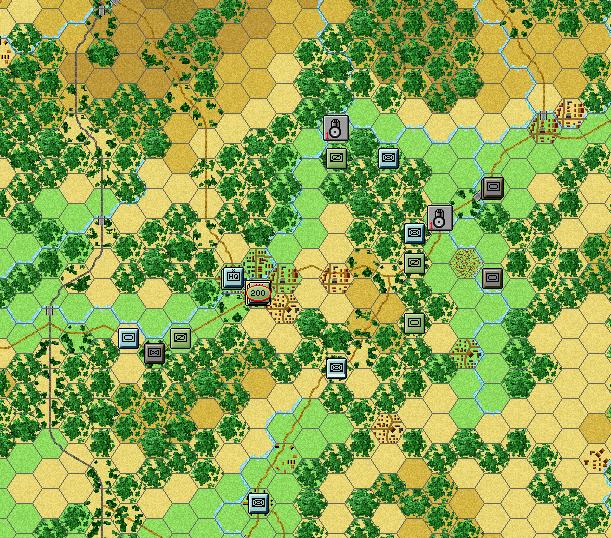
As I moved forward I discovered a couple of those GDR Helicopter units in my rear. At the place marked by the red X, I found and destroyed a recon chopper that had landed in a hex I planned to occupy in my defense of Bad Kissingen. As you can see the Units of the Eaglehorse, the 2nd of the 11th Cav are now in the fight and are moving forward to take up positions east of Bad Kissingen.
A unit of German Artillery off to the north has fired an artillery mine into the clear terrain skirting the woods on the north side. I also hammered the GDR Recon Unit located north of Bad Neustadt and I think the losses and Fatigue inflicted should deprive the Warsaw Pact player of this unit in the advance to Bad Kissingen - at least I think. That said, the enemy strength is estimated at in excess of 300 T-72's, and T-55's. And while their crew quality and training is not up to the Nato standard, it dwarfs the 120 Abrams, Bradly's and Leopard I's will have at my disposal. But for this next phase of the battle I will have to make do with my four US Cavalry units to hold on with.
Öthe Battle of Bad Kissingen is about to begin and I fear I am badly outnumbered!
Warsaw Pact Turn #4: 1800 10 June 1985
Night is approaching and some bad news I have lost my eyes with the light helicopters all being destroyed trying to pin point the enemy, looks like the German Mech Infantry have been joined by a US Cavalry unit. My armed helicopters tried with no success to stop them moving up the valley at Bad Neustadt. I have decided to split the force and have sent two regiments to the south to try to move around the blocks in the valley, lost some units while moving. The Heliborne company is digging in on the road west of Bad Kissingen.
Nato Turn #4: 1800 10 June 1985
Dusk, and another turn of Hit-n-Run.
Watching my opponents replay I was surprised to see a friendly Air Interdiction strike much south of the main route which made me wake up to the idea that my small force must now be stretched to covers many possible avenues of advance.
I pulled back from my frontline positions once again and in one case fired an Artillery Mine as my units retreated - I hope to bring him through this hex and cause him some grief at least - perhaps a disruption even. With the need to covers a wider front I pulled my pure Abrams Tank unit back to cover a thin place in the woods where I suspect the Warsaw Pact forces may come in force.
In another development as I moved my remaining German units forward I discovered an Air Mobile Infantry Unit astride of the road. Not only does that cause me grief but I had to pull my reserve Bradley Squadron out of Bad Kissingen to help hit it. The good news is I hit it and hard causing a disruption. But it will get away next turn. I've also been forced to break down the remaining German Panzer Gren Battalion in order to cover more of my southern flank unit I know where he is.
Warsaw Pact Turn #5: 2100 10 June 1985
The heliborne company got bumped digging in by a squadron of tanks, then by some Bradleys, it looks like the US and West Germans are here in battalion strength. Things are not looking too bright, they mined the road, which I guessed would happen, but bumped my engineers as they arrived in Transport mode, so they could cut them to shreds instead of me getting the road cleared. The flank attack to the south is progressing slowly and the units are spread a little far between each other. Situation then isÖ I have most of the armor to the south with most of the infantry along the road. I moved the AT helicopters to cover the Bad Kissingen road, but they are low on missiles, so I hope there is not too much action there. I hope the night passes swiftly as the NATO troops have much better equipment than we do.
Nato Turn #5: 2100 10 June 1985
Well now I am worried. After watching the replay I can only see two units - An Engineers trying to clear a Mine from the main road and a single tank. The tank unit is a diversion in my opinion - something to keep my attentions - I'd bet it is his Motorized Rifle Regiment. But the Engineer is in Travel Mode and I can't resist hitting it with as much as I can. First shot with the German Arty unit moving in from the north.
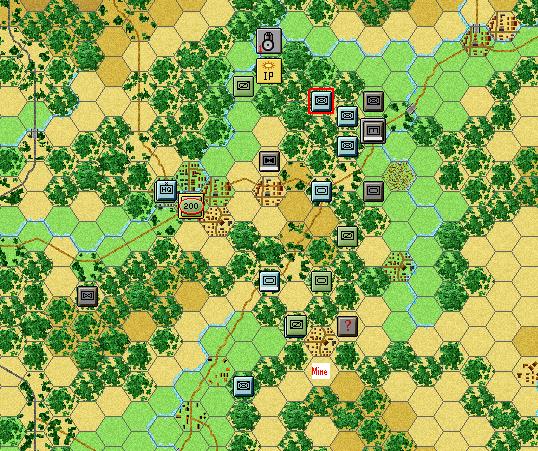
I have a single Air Recon Mission and decide to the south and BINGO I've spotted something - so I know he is moving there but I don't know if this is the van of the advance or not - and of course right now I have only two companies of Panzer Grens in the area.
Time to Gamble!
I'm going to re-orientate my entire defense around a strong right flank where my recon has spotted the unit moving south. I fired another Arty Mine so when he move forward into the next town he will take fire from the woods. If he moves on he is into a minefield. Then if he moves through the trees, it is right into my Abrams backed up by the main force of West German Leopards.
The Center is OK and it will have to take car of itself - my left is weak, very weak and I've had to abandon my IP in the Trees in favour of holding the woods to the south - I sure hope this pays off.
Warsaw Pact Turn #6: 0300 11 June 1985
Bad airstrike on my engineers, I have loaded up the road with Infantry, my armor was bumped going around the south, but I pushed back the covering force at the northern road, it is split into companies now. Fuel and Ammo becoming a factor now, I have moved the HQ forward as far as I dare. Found the arty and HQ in the town will try for a strike next turn.
Nato Turn #6: 0300 11 June 1985
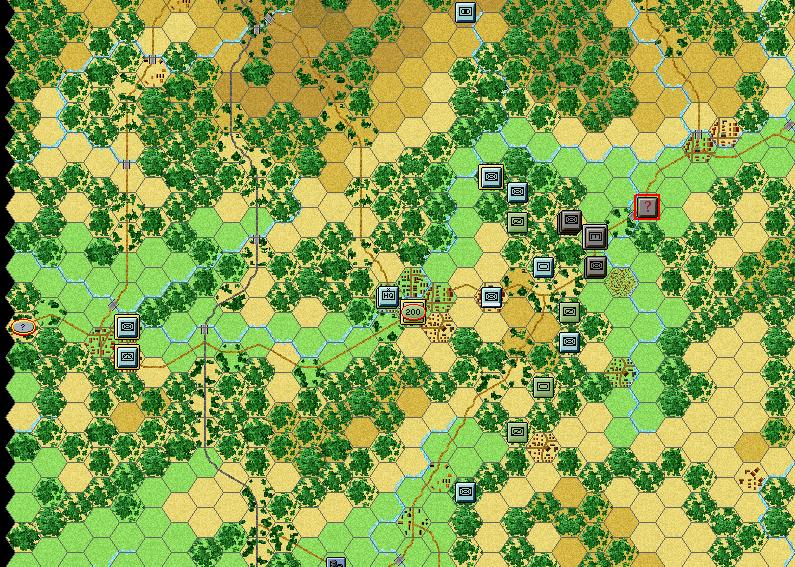
Unfortunately Warsaw Pact morning attack I was expecting didn't pan out. He came at the middle and it seems he has elements of both the Motorized Rifle Regt and a Tank Regiment. That leaves at least a Tank Regt on my south flank and Öwell Ö. I don't know where the other Tank Regiment is. But SIGINT shows his Division HQ is in the center and all indications from his Artillery is he is formed up and capable of doing damage in the center. (note the Unit with the "?" is the SIGINT spotting)
And while my hard hold on the right flank didn't pan out, I am still holding my own in terms of losses. However, my original two battalions of Panzer Grens are in pretty hard shape now.
So, like on previous turns, I give a little ground and reinforce the center with a combined Btln of West German Leopards. I have to move back now to minimize the number of shots he gets at me and make it difficult for him to muster a force to assault me.
The Battle of Bad Kissingen has begun in earnest! And we hope you will be encouraged to try out our games and see for yourself how the battle ends.
Please note: The scenario After-Action-Report you have been reading is not part of the default Fulda Gap '85 game - rather it was created by the authors of this article to illustrate typical play in The HPS Series Modern Campaigns, particilarly for the titles Fulda Gap '85 and North German Plain '85.
There are four Modern Campaigns titles in the Series. Middle East '67 covering mainly the 1967 Arab-Isreali War but with scenarios of different perods too. And three titles that deal with a hypothetical War in 1985 that takes place in Europe but that also spreads to Korea.
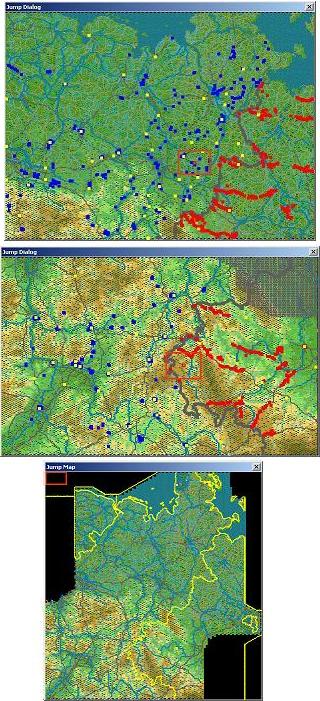
The first map at the left shows the map area and setup for the campaign scenario for North Germany Plain '85. This game contains 35 Scenarios in an area of 57,000 square miles of central Germany and a comprehensive OOB or a wide array of Nato Allies and Warsaw Pact Nations, including US units which in the course of the game move northward from central Germany in response to the main drive by the Soviets.
The second map at the left shows the map area and setup for the campaign scenario for Fulda Gap '85. This game contains 27 Scenarios in an area of 40,000 square miles of central Germany and focuses on US and West German against the Warsaw Pact.
The third map shows is a combined Fulda Gap + North German Plain Map with additions of more area in Denmark and the inclusion of Berlin. This map is part of a freely distributed post release Germany expansion pack that is playable only in North German Plain '85. The Bad Kissingen scenario is an expansion scenario which uses this Germany Map as the source. The scenario will be released in a future Germany Expansion pack.
About the authors:
Glenn Saunders and Dave Blackburn are longtime John Tiller Wargame fans who have for the past few years been involved with HPS Simulations and John Tiller to help create and support WWII and Modern Area Wargames. Dave, or "Blackie" as he is known to his friends just recently retired from Transport Canada where he was a Aviation Inspector for Rotory Aircraft. In his earlier days he served with the British Army and was stationed with the British Army of the Rhine (BAOR) on the North German Plain. Glenn works in Customer Service for a Oil and Gas Software company in Western Canada. In his younger days he attained the rank of Captain in the Canadian Forces but currently on the Supplementary Reserve List. These games are support by Glenn's website at:
http://members.shaw.ca/gcsaunders/index.html
81.Fulda Gap.scn ñ ìBetter Dead than Redî Notes
From ìA Cold War Conundrumî By Benjamin B. Fischer:
ìSoviet intelligence services went on alert in 1981 to watch for US preparations for launching a surprise nuclear attack against the USSR and its allies. This alert was accompanied by a new Soviet intelligence collection program, known by the acronym RYAN, to monitor indications and provide early warning of US intentionsÖ.
ÖMoscow was in the midst of a war scare that had two distinct phases--a largely concealed one starting in 1981 and a more visible one two years laterÖ.
ÖIn early 1981 the KGB's foreign intelligence directorate, using a computer program developed several years earlier, prepared an estimate of world trends that concluded the USSR in effect was losing--and the US was winning--the Cold War. Expressed in Soviet terms, the "correlation of world forces" between the US and the USSR was seen as turning inexorably against the latter.î
This is the basis of my war.
Game system ñ Although this scenario covers the same area as the Fulda Gap ë85 game, it was designed using the North German Plain í85 game. The reason for this is that it was started before FGí85 was updated and I needed the Strategy/Option capability found in NGPí85. The map uses the Northern Europe map file just released.
Files ñ All files begin with ì81 Öî This is to make it easy for a player to remove these files at a later date should he decide to. In addition, it means that none of these files will over-write any existing files (i.e. artwork).
Zone of Control ñ The ZOC value in the PDT file was changed so that it now allows movement from one enemy ZOC hex to another. This movement uses the entire movement allowance of the moving unit. In the past, battalions were described as having the ability to influence more than a single hex and this is why a ZOC exists. However, I have now made it so that most battalions (other than WarPac tank battalions) can breakdown into companies. A battalion can now actually deploy its component companies into adjacent hexes. Therefore, a battalion will now have to deploy its companies into adjacent hexes in order to prevent enemy units from bypassing and isolating it. This will also help to better simulate the tactical doctrine of the period.
Stacking ñ I reduced the hex stacking to 600 men/60 vehicles. The road stacking is the same. This size was determined by reviewing the NATO and WarPac (Warsaw Pact) doctrines resulting in an understanding that no more than two battalions would stack in a 1-mile area under offensive operations.
Turns ñ Daylight turns were changed from 3-hour increments to 2-hour ones. Night turns were changed from 6-hour increments to 3-hour ones. In modern combat things happen at a much faster pace than during World War II; so, it is my feelings that the turn length should be at least equal to the WWII games.
Pre-War Moves ñ The first ten turns of this scenario are considered to be pre-war moves. Neither side can conduct offensive fire against the other. Nor, may either side cross the Inner-German Border (IGB) until turn 11 (10 May 1981). NATO forces are prohibited from entering any hex adjacent to the IGB (use VIEW ñ AREA BOUNDARIES in the tool bar to see the border). This is to reduce/prevent accidental defensive fire against the Warsaw Pact forces as they move up to the IGB. Bridges may not be damaged prior to turn 11.
Objective Oriented ñ This scenario is objective based. By this, I mean that the victory conditions should be only attainable through the capture of objective hexes and not the destruction of enemy forces. A war in Germany is going to be won or lost based on how much of West Germany is occupied. Losses matter little. So, ìours is not to reason why, but to do and die.î
Automatic Major Victory ñ The WarPac player should be automatically awarded a MAJOR VICTORY should he capture objectives totaling 10,000 victory points from those east of hex row 125 before turn 33. This is to entice the NATO player to conduct a forward defense as per West German doctrine. You see the West Germans did not like the idea of surrendering any territory to the WarPac. And, because the Bundeswehr was going to fight for every inch of West Germany, the rest of NATO was pretty much forced into this doctrine.
Company-sized Formations ñ Certain units of company size have an asterisk at the end of their name. These formations are coded as battalions in the Order of Battle file. This was done so that they would not be penalized by the rules concerning fatigue and units designated as company or platoon. Many of these formations are specialized formations that normally operate as a company level formation and it did not seem appropriate to penalize them for their doctrinal employment (i.e. the ATGM battery of a motorized rifle regiment).
Recommendations on OPTIONAL RULES ñ The following rules are (not) recommended:
(1) Limited Air Recon ñ WARPAC ADVANTAGE [RECOMMENDED] ñ There is substantial air power allocated to NATO. It is intended that these air strikes be used for CLOSE AIR SUPPORT missions only. AIR INTERDICTION is assigned to those aircraft not represented in the game (i.e. the F-111, the Jaguar, etc.) So, if those air strikes assigned CAS missions were to be used in the AIR INTERDICTION role, players would find the WarPac player would loose all of his artillery and engineers, unbalancing play. In addition, the aerial recon elements were broken down into smaller units to allow for many more sorties and, therefore, are provided strictly for intelligence gathering purposes.
(2) Indirect Fire And Air Strikes By The Map ñ WARPAC ADVANTAGE [NOT RECOMMENDED] ñ NATO units have been organized in the oob file to maximize their indirect fire capabilities based on doctrinal procedures. WarPac units, while having good artillery, are more rigid in their employment. So, if this option is to be used, the WarPac units will have a significant increase to their indirect fires capabilities.
(3) Optional Surrender ñ WARPAC ADVANTAGE [NOT RECOMMENDED] ñ The availability of helicopters and airmobile infantry make this option extremely powerful and unrealistic. And, the change to the PDT file that allows movement through ZOCs make it much easier to isolate an enemy unit.
(4) Explicit Supply [UNAVAILABLE] ñ Sorry, but based on the reduced stacking limits, supply units are impractical.
The scenario was playtested with the following options:
(1) Recon Spotting
(2) Virtual Supply Trucks
(3) Night Fatigue
(4) Higher Fatigue Recovery
(5) Counterbattery Fire
(6) Limited Air Recon
Significant Warsaw Pact Order of Battle Changes ñ
(1) Infantry battalions are now broken down into company formations. This was done to support the reduced stacking and better represent doctrine.
(2) An engineer company was added to each tank and motorized rifle regiment per FM 100-2-3.
(3) The divisional engineer battalion was broken down into two elements.
(4) An independent tank battalion of 41 tanks was added to each Guards Motorized Rifle Division per FM 100-2-3.
(5) East German mobilization divisions (10 MSD & 17 MSD) were added.
(6) East German Workerís Militia and Grenztruppen units were added for rear area security in East Germany.
(7) A Raydoviki (Raider) Battalion was added, which is the Soviet version of the US Rangers.
Significant NATO Order of Battle Changes ñ
(1) West German Territorial Army units were added for rear area protection missions.
(2) US Special Forces (deception) units were added.
(3) 1-75 Infantry Battalion (Ranger) was added.
(4) West German commando (deception) units were added.
(5) 4th Infantry Division (Mechanized), a REFORGER unit, was added.
(6) M107, 175mm, self-propelled artillery battalions were added to the Corps Artillery.
(7) 26th Luftlandebrigade was added as an airmobile unit.
Tanks versus Infantry ñ Having played many scenarios, it became apparent to me that infantry units do not have the ability to stand up to tank units in the game. However, it is common knowledge that tanks cannot dominate infantry in the modern age (1980ís) to the same degree they did in World War II due to the abundance of anti-tank weapons (TOW, Sagger, Dragon, RPG-7, and LAW). Tanks carry only a minimum amount of anti-personnel rounds for their main guns. A tankís machineguns are its primary anti-personnel weapons. Therefore, I have decreased the SOFT ATTACK ratings of most tanks to around 15 and increased the HARD ATTACK ratings of most infantry. Tanks still have a strong ASSAULT rating for overrun purposes.
Airpower ñ This is something that I had to change. Air strikes in the series seem to have minimal impact. So, I increased the attack values significantly. For example, an A-10 is provided a 40 hard and a 28 soft attack values by HPS. I increased the hard rating to 200 hard and increased the soft attack value to 70. The reason the soft was not increased by the same ratio, is that I looked at whether the aircraft is going to be loaded to strike at hard targets or soft ones. The A-10 generally is going to attack tanks, so it is given a predominately anti-tank weapons load. However, I also decreased the number of aircraft in a strike. For example, a US squadron has 18 to 24 aircraft that HPS includes in one strike. I divided the squadron into two strikes of 9 to 12 each.
If I could, I would have made two or three-plane sortie. This would give the A-10 sortie three planes rated at 600 hard and 210 soft, but that would have made the victory points for each lost aircraft astronomical. So, I changed the pdt file so that air availability was 50%. This means that the strikes would be available more often. In effect, I am abstractly accounting for smaller sorties by having them happen more frequent.
Another change to airpower is the number of aircraft that can attack a hex. It is my belief that you would not see 40 aircraft attack a single hex in a three-hour turn, much less a two-hour one. So, I changed the air strike limitation to 15. This effectively means that you can normally only strike a hex twice in any one turn.
In addition, the air interdiction chance is cut in half, but the percentage of effect was raised from 25 to 30.
Air Defense ñ The anti-aircraft gun units were removed and the AA rating for units supported by those systems was increased. I found in play and testing those AAA units were targeted more frequently and/or used more in non-doctrinal roles. In addition, divisional and higher HQ units were given an AA rating of 8 or higher to increase the simulation of the SAM capabilities, so that aircraft have a greater chance of being shot down.
US Divisional Airmobile Battalions ñ I tried to represent the lift capability of the division's aviation battalion by giving a single battalion of each division airmobile capability. Realizing that a division probably could lift only a company-sized force at any one time, I decided to assume that corps aviation assets are assisting. The battalion was selected at random.
Helicopters ñ I omitted scout/recon helicopters from the Order of Battle. This was done based on my belief that scout/recon helicopters have a disportionate affect in the game compared to their actual capabilities. I used the assumption that they support the attack helicopter units and, therefore, would be co-located with them. This keeps players from using them in a non-doctrinal manner.
In addition, the attack helicopters had their HARD ATTACK values significantly increased to better reflect their tank killing abilities. And, finally, due to the game systemís mechanics of allowing helicopters to be on station for long periods of time without having to refuel and rearm, I have reduced the number of helicopters available from the companies/squadrons to approximately one-third of their total strength. This better represents helicopter operations as one-third would be refueling, rearming, and maintaining; while one-third is in route; and, one-third is engaging the enemy.
WarPac Engineer Battalions ñ Originally, I had the WarPac engineer battalions broken down into their component companies of one mine company, one technical company (mine capable) and three bridge/pontoon/ferry companies. These companies had 55 to 65 men each. Playtest showed that these companies did not survive very long due to air interdiction and NATO targeting of engineer units. Therefore, it was decided to combine the companies into two multi-task (mine and bridge) capable elements.
DDR Workerís Militia Battalions and Grenztruppen ñ These units have been created by the East German government for the protection of the DDR in the event of a war and for border guard duties. They are strictly for security purposes; therefore, players should not use them beyond the borders of the DDR. Players will note that these units are FIXED; therefore, the NATO player would be better off not moving into spotting range and releasing them.
Rangers & Raydoviki ñ Each side has been given a battalion of Rangers/Raydoviki (Raiders). These units have been classed as engineers to give them the ability to blow-up bridges. Because these units are classed as engineers, they have additional abilities that hopefully players will not use (i.e. mine laying, ferrying, clearing rubble, and improving the digging-in chance). It is this designerís intent that the only engineer function that they use is blowing-up bridges.
Training Areas ñ The US has what are known as Major Training Areas (MTA). It shares these areas with other NATO forces. Some of these areas include: Wildflecken (hexes 135,94 + 135,95), Grafenwoehr (hex 214,152 and south), Baumholder (off-map, west of Kaiserslautern ñ hex 0,105) and Hohenfels (off-map, south of Grafenwoehr). In addition, there were smaller training areas located throughout the CENTAG sector. One brigade of the 3rd Armored Division has been chosen at random to start at one these locations.
[Home || Games || Panzer Campaigns || Modern Campaigns]